Reimagining a Previous Design (week 8)

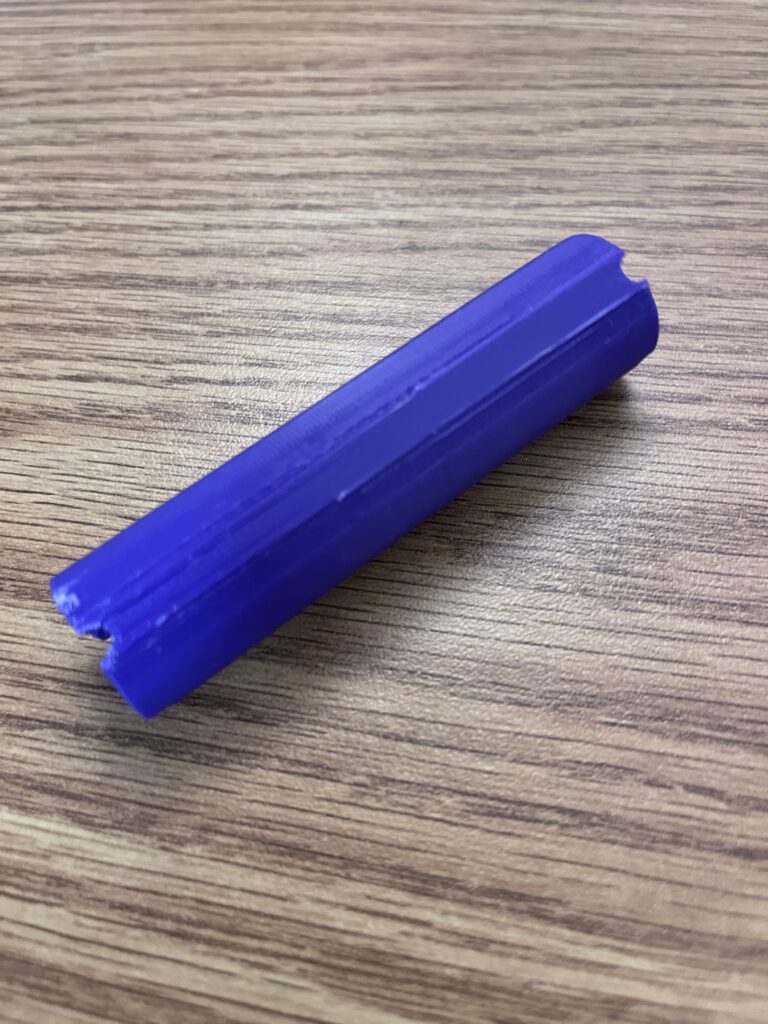
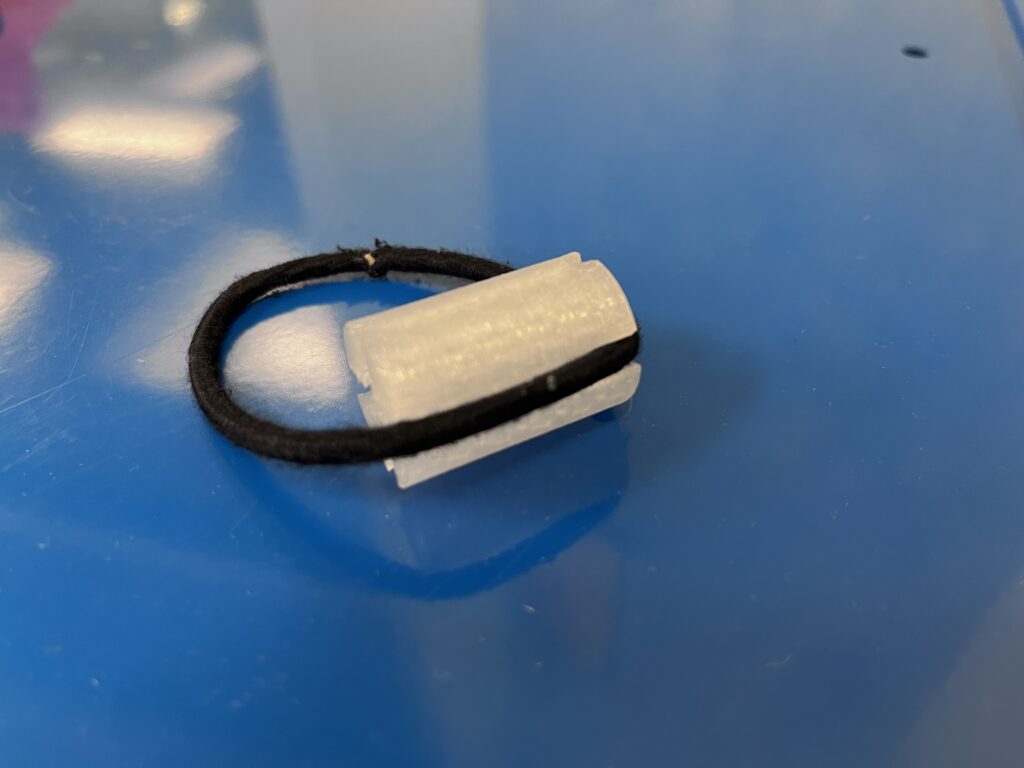
After testing Design 6, both on myself and on my friend, I concluded that the idea of creating a tool that stretches open an elastic was going to be the best option. I think that Design 6 needed some curved ends to make the elastic stay in the divots of the tool. In this design, I shortened the length of the cylinder and added divots on the sides to increase the ability of the elastic to stay attached to the tool. I liked the addition of the side divots, but the tool kept slipping out of my and my friends’ hands and the elastic. I think slightly curving the ends and making the cylinder about 10 mm longer could have helped.

A 40 mm cylinder with divots on the side of the cylinder and cross divots on the ends. A hair tie is in the divots
Design 6

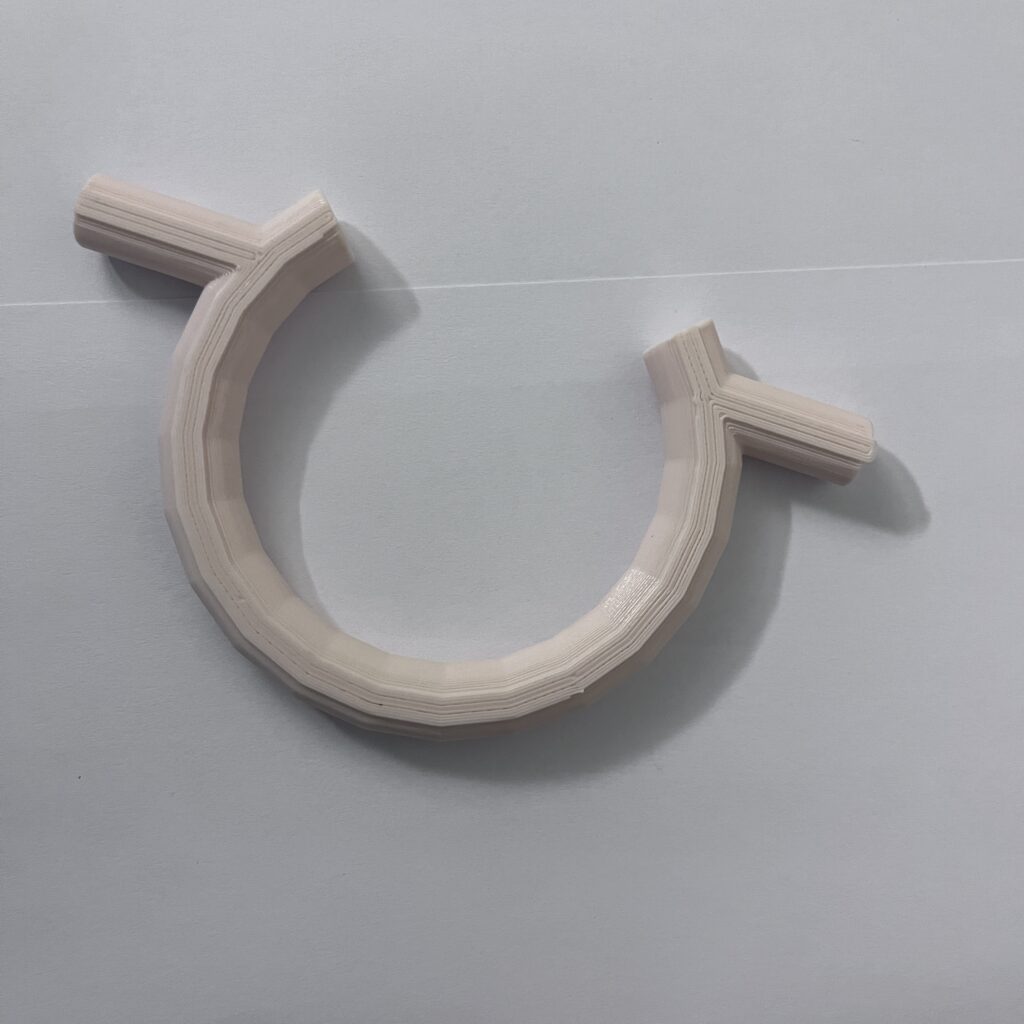
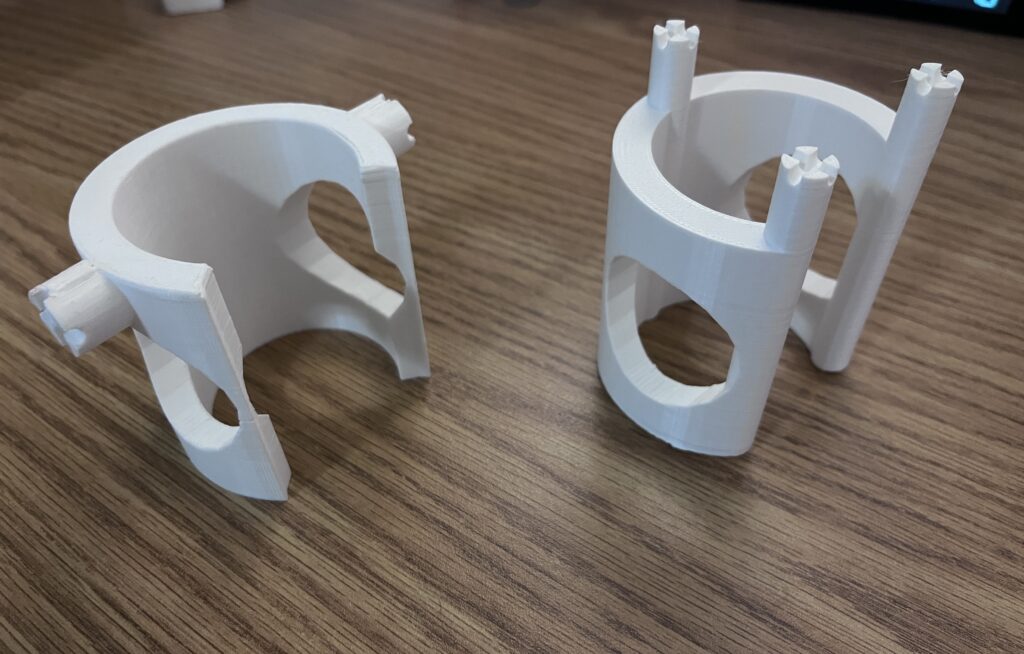
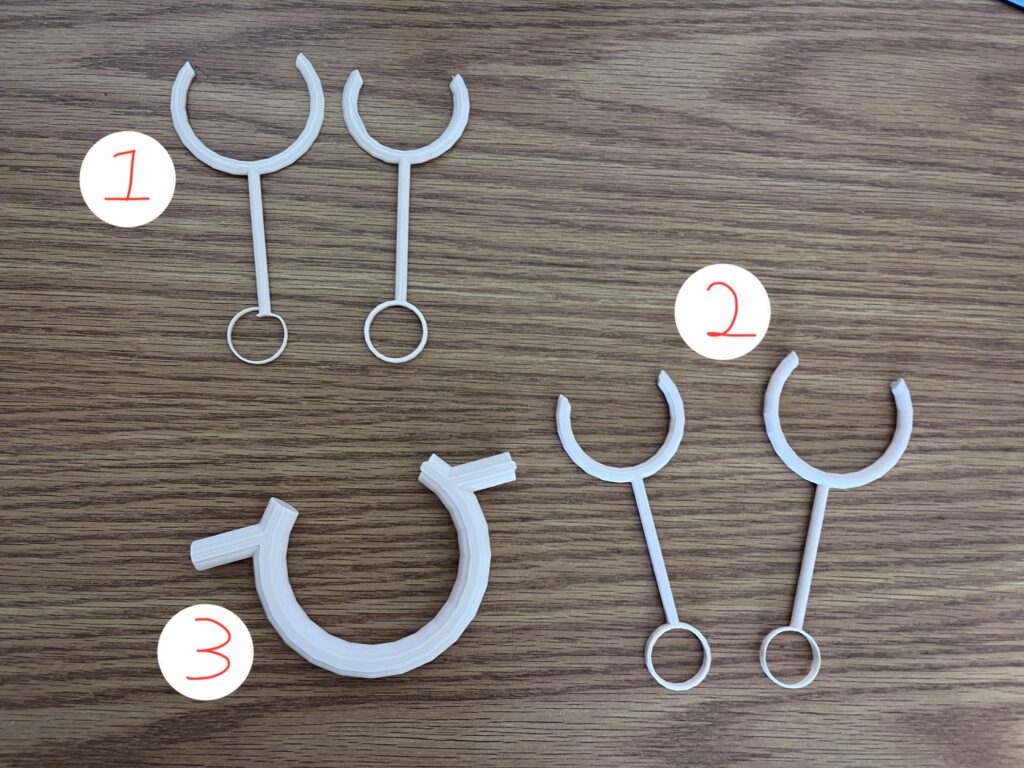
Looking back on previous designs, I noticed that Design 3 had the curved ends that I wanted. I tinkered around with Design 3 and tried out different ways of holding, stretching, and twisting to see if I could salvage the design. In my original third design, I planned to have the hair sit in the “U” shape and figure out a way for the elastic to twist around the hair. When I was tinkering around with this design after testing Design 6, I flipped the tool upside down and used the “U” shape as a handle rather than a holder. The knobs allow the elastic to be stretched open and the user can guide a fist of hair through the elastic. Once the hair is guided through, the user can twist the handle and repeat the steps. This design took some practice, but my friend was able to use the tool to tie her hair back. It is not perfect and I do not think this is the easiest method of tying hair back, but this is the closest any of my designs have come to working for my friend. This was the first design that she liked. Although I do not have time to refine this design, I plan to highlight this design on my website and make a video and instructions on how to use it.

A cylindrical circle that is not completely closed. There are two knobs on each side where the circle ends.
A cylindrical circle that is not completely closed. There are two knobs on each side where the circle ends. A hair tie is fitted around the tool.

A Mini Design (week 7)

This week I modified Design 4 by making it shorter and adding divots. Design 4 was an 80-millimeter cylinder with cross divots on each end of the cylinder. It mildly worked but it was awkward to use. With the past few iterations, I have been thinking about making the tool help with holding/gripping on the elastic rather than making a tool that does the twisting and pulling hair through mechanism. I decided to put divots on the sides of the cylinder so that the elastic could sit in the tool and not move around as someone uses the tool to stretch the elastic open. I was luckily able to print my design this week and I hope to test it over the weekend. The project is due in one week and with the hopes of this design working, I will be making Design 6 my “final design” that I show at the Big Project Showcase and highlight on my website and potentially Thingiverse.

Design 4 is an 80 millimeter cylinder with cross divots on each side
Design 4
Design 6 is a 30 millimeter cylinder with divots on the sides of the cylinder and cross divots on each end
Design 6

Modeling, Printing, Blogging, and Testing (week 6)

I was able to print Design 5.1 which was candy cane shaped. The design was made in OnShape, which has a learning curve but was successful in helping me make a hook on the side of a cylinder. It has been tricky getting time with the 3D printer, but I was able to print my designs so I could have multiple designs for my friend to test.

On Wednesday night, I asked my friend to test Designs 3, 4, and 5. I knew Design 3 was likely not going to be successful for her, but I wanted to see how it worked and what could be modified to make it work. The biggest issue was that it was too big for the elastic to wrap around multiple times. One thing that Design 3 highlighted for me was that I should consider hair types. I have medium-thickness hair that is straight and my friend has puffy hair which can be hard to wrangle while holding a tool. Considering hair type is something to consider in my designs.

Design 4 had potential but I think it needed to be longer so that the hair could drape over the cylinder. My idea with Design 4 was that if the hair tie is in the divots of the cylinder and the hair is over it, I could rotate the cylinder, flip the hair over, and then wrap the elastic around the hair. Designs 3 and 4 were made in TinkerCad

3D rendering of design 3.1 which is a semi cylinder with three pegs coming from the top
Design 3
3D rendering of Design 4 which is a cylinder with cross divots on the faces of the cylinder
Design 4

Design 5 worked well but I definitely need to consider hair type for this design because that will determine how much hair can fit in the hook. The hook worked when I grasped my hair put the elastic around my hair and then used the hook to stretch and twist the elastic. I still had to pull my hair through the elastic, but it was easier with the hook holding the elastic. This design was pretty close, but it does require some fine motor skills to pull the hair through the elastic.

3D rendering of Design 5.1 which is candy cane shaped
Design 5

I have one final idea for a design that could work. What if I made Design 4 smaller? At first, I thought I needed it to be bigger so more hair could be draped over it but now I’m thinking, if it were smaller it would act like a grip for the elastic. Instead of trying to wrangle the hair into a hook or something, this design would be a tool to grasp the elastic better so the hands can focus on grabbing all the strands of hair.

More Printing and Learning OnShape (week 5)

This week I continued working on iterating through designs. I printed Design 4.0, which was a cylinder that had cross divots on each side. The design had potential, but I thought a hook on one end could make it better. I attended a workshop by the Digital Knowledge Center and learned some basics in 3D modeling in OnShape. I wasn’t sure how I was going to make the hook in TinkerCad, so I decided to make Design 5 in OnShape. There was a bit of a learning curve for OnShape, but luckily they have good documentation on their website and I was able to ask my friend AJ for some help. It has been tricky getting printing time with the 3D printer on campus, but I was able to print Design 5.0 over the weekend. My design in OnShape printed successfully, but was too thick, so next week I will have to modify the design. There are not a lot of big updates this week because a lot of it was spent trying to learn OnShape and making my model.

Design 3.0 & 3.1 results and starting Design 4.0 (week 4)

3D prints of Design 3.0 on the left and Design 3.1 on the right. The models are cylindrical shaped and have knobs coming from the sides and top.
Design 3.0 on the left and Design 3.1 on the right

This week I tested Designs 3.0 & 3.1, which were printed at the end of last week. I also designed and printed another prototype. I tested Design 3.0 & 3.1 on my own hair and concluded that although the design works, it makes putting your hair up more complicated, which is the opposite of what I’m trying to do. This design was not a complete failure though; I learned a lot from this design. With these designs, I created knobs for the elastic to hook onto allowing the user to let go of the elastic and re-adjust. With my previous designs, I created knobs for the elastic to hook onto, but the elastic kept sliding around. In Design 3.0 & 3.1 I created a cross-shaped divot in the knobs which fit the elastic perfectly.

One aspect of my design that made it harder to put my hair up was that the half cylinder was too thick and there wasn’t enough room to stretch and twist the elastic easily. The knobs on the side worked well, so I tinkered with one of my earlier designs that had the knobs, but not the divots.

Later in the week, I started designing and printing Design 4.0, which was just a cylinder with cross divots on each side. My idea with this design is that the cylinder could be grasped with the hair and force the elastic to twist around the hair. This design sort of worked, but I would be interested in making a hook on one side to grab the elastic and hook the hair through the elastic. Another challenge is that I am testing these tools on my hair so I cannot always see the mechanics of what is happening with my designs. My next steps will be to create a design that goes off of Design 4.0 by adding a hook to one side and asking my friend to test some of my designs.

3D print of Design 4.0. A purple cylinder with cross divots on each side.
Design 4.0

Attempts 3 and 3.1 (week 3)

I am still trying to figure out the twisting mechanic of tying up hair, but I think I am getting closer with my third design. With Design 3, I created a half-cylindrical shape to guide the hair into the elastic. There is a small cylinder knob on each side of the half-cylinder. After working on the design in a few sessions, I created a cross divit in the knob so the elastic could latch to the knob, with the intent of stretching the elastic enough to get hair through it. There are holes on each side of the cylinder so that someone can reach their fingers under the elastic to twist the hair through. 

Design 3.1 as it is being printed on a 3D printer

As I was creating Design 3, I came up with a variation of this idea after watching a video of an amputee putting their hair up with a different tool. The tool they were using was brush-shaped and did not seem as effective, because it seemed like she was still struggling to get her hair up and it seemed like a loose ponytail. One thing that I did notice was that the tool had three prongs. The three prongs intrigued me as I was expecting her to use the prongs to tie the elastic by moving the elastic from one prong to another. I used the base of Design 3 and put the knobs on top of the cylinder instead of on the sides. I also used three knobs instead of two so that there was a knob available for switching the elastic from one twist to another. 

The one caveat of this design is that the holes in the sides for grabbing elastic force me to add supports to the model when I print it. Design 3 took 4 hours and 13 minutes, and Design 3.1 took 4 hours and 32 minutes. This is a big jump from my previous designs which took about an hour to an hour and a half, but in the 3D printing world, a 4-hour print is not awful. 

This week I created Design 3 and 3.1 and printed each of them. I have yet to test them as the prints took almost 9 hours, but at the beginning of next week, I will be testing them, and then starting on the next iteration of model revision and printing!

The first few attempts (week 2)

During the first week of designing I had an idea to stretch the hair tie wide enough so that someone had enough room to pull their hair through. I started with a ring that had a hook on an extension. I thought that if I could extend the stretch of the hair tie it could allow more flexibility to get the hair through the elastic. I made a design in TinkerCad and printed it the next day. Halfway through the first print, I had to stop it because the print popped off the build plate. Because my design was thin and long, there was not enough material sticking to the build plate, so the print got loose and came off. I went back to the slicing software and added a brim to ensure that the print could adhere to the build plate better. This first print took about 40 minutes.

After I printed the ring with an extender hook, I printed just the ring with some side hooks for the hair tie to latch onto. This print took about an hour including a brim to ensure build plate adhesion. The ring concept worked well for someone to insert their hair into the opening of the ring, but I was missing the twisting aspect of tying hair up, so the elastic was not wrapping around the hair.

The first three attempts at printing an adaptive hair tool. Made with a 3D printer. The basic design is a ring a few inches in diameter and a section removed from the ring.

Later in the week, I tested both of the designs. Neither of them worked the way I wanted them to, but with the second attempt, I had a good idea of how to design the third attempt. The problem with the first design was that the ring extender was too high. I overestimated how much stretch was needed to keep the hair tie open to put the hair through. Even if I made the extension shorter, I don’t think it would’ve worked. I still can’t seem to figure out the mechanics of twisting the hair tie and that is another reason why the second design did not work as well as I thought.

These two designs helped me realize that I need to spend time figuring out the twisting mechanic of putting hair in a ponytail. I’m not sure if I would be able to make a moveable part or if I need to think about a better way to stretch the elastic for hair to go through. I have an idea for my third design, so my next ew goals will be to finish planning the design, making it in TinkerCad, and then printing it so I can test it.